Hello everyone in this next section of the course we will learn about a couple of new tools named node.js and NPM.
Let’s not worry about the names of these tools for now and instead let’s begin with a few questions. So the first question that you might have is are all of these tools really necessary? Why are we not writing HTML CSS and Javascript yet? Why can’t we just get started building the actual Web site.
That’s a fair question. I know that it’s one I personally asked when I first heard about these other tools and here is the answer. Here is why we need a few other tools.
It’s because while we build the site, we want automation and organization, automation will save us time, and organization will save us from pulling our hair out.
So let me elaborate on those two terms a bit. Automation just means to take a task and make it automatic make the computer be able to do it for us. So when we are building a web site if there is a small task that we find ourselves performing again and again and again, even if it only takes a few seconds imagine how much time we can save throughout the course of a day if we can find a way to make the computer perform that task for us automatically.
Let me give you a few real world examples. So whenever we save a change to one of our html or javascript files we then want to see what those changes look like in the web browser. Now instead of hopping into your browser and hitting control our or command are are hitting the refresh button, wouldn’t it be nice if your computer could detect that you had saved changes to a file and then automatically trigger a refresh in the browser for you.
Your computer definitely can do that for you. And that is an example of automation. For another example of automation we could set up something called CSS autoprefixer. Now in recent years we don’t need to use CSS vendor prefixes as much as we used to. But for certain properties they are still necessary.
Now instead of wasting the time of typing out all of these messy vendor prefixed names or even wasting the time of trying to memorize which properties need prefixes and which don’t,We can set up our computer to watch for any saved changes to a CSS file and then it will automatically trigger a filter to run on our CSS files and the computer is intelligent enough to know which properties need to be prefixed and it will automatically add those prefixes to our CSS. That will save us a lot of headache. that will save us a lot of time and that’s another example of automation.
So that’s automation in a nutshell. there are a lot of different tasks that we can automate using node.js and NPM that will save us a ton of time on a daily basis.
Next let’s talk a little bit about organisation and how node.js and NPM can help us stay organized.
Let’s begin with CSS organization. As we write the CSS for our Web site we don’t want to place all of the code within one single huge CSS file. Instead we want to stay organized by keeping our CSS separated in multiple bite sized files. So for example any CSS code related to the header of the website would go in it’s own file named header.css
Any styles related to the footer of the web site would go in a file named footer.css. This way if we need to revisit an update the Web site six months or even a year down the road we will know exactly where to find that little bit of CSS that we want to update.
Having said all of that we still don’t want to litter the head section of our Web site with calls to 40 different CSS files even though we as the developer want to work with multiple bite sized CSS files at the end of the day we still want to surf the web browser and the visitors of our Website one single CSS file.
The good news is that we can have the best of both worlds. And this ties back into automation; we can set up our computer to watch for any saved changes to any of our multiple bite sized CSS files and when a save is detected the computer will automatically in the matter of a few milliseconds, combine all of our little CSSA files into the one single file that we can serve to the browser, while still leaving all of our little CSS files intact.
This way our Web site will load quickly and we as the developer can still stay organized. So that’s one example of CSS organization. We will learn about any others throughout this course. But for the time being.
Before we bring this lesson to an end there’s one final type of project or code organization that I want to talk about and that is package management.
We will learn about package management in detail throughout the course. But for now I want to keep things really simple. So what is package management.
Well if you’ve created a Web site in the last few years odds are that you used
- JQuery or maybe you used
- Bootstrap.
Personally I’m not a fan of bootstrap. We will not be using it in this course but it’s just an example. Or maybe you used the popular CSS reset named
- Normalize.css
Now what do those three things have in common. The answer is you didn’t write or create any of them. They are pieces of code or packages that someone else maintains and you might use 5 10 or 20 different packages on a Web site that you create. Now as you’re going to Google and searching for Jay query are going to Google and searching for bootstrap to get the files to download. If you’ve ever thought to yourself there’s got to be a better way of doing this. There’s got to be a faster more automated way of getting access to all of these different files.
Well if you’ve ever thought that you you’re absolutely correct: there is a better faster way of getting all of those files. And it’s called package management. We will learn all about package management in the next few lessons.
But for now this lesson has come to a close. Let’s review what we’ve covered.
- Automation. We learn that when we build a website we want automation and
- organization now that
- We learned what’s possible… we know what’s possible
- The key forward is learning node.js and NPM.
now that we know that we can configure our computer to do all of these neat automatic things for us. It’s just a matter of learning how to make the computer do all of that. The key to turning your computer into your own little robot assistant is learning a few tools named node. JS. and NPM.
In our next lesson we will learn what in the world Node.JS even as you will get your hands dirty. I will help you install node on your computer and we will walk through a few code examples together step by step. It’s going to be a lot of fun and I will see you in the next lesson.
Hello everyone in this lesson we will learn about Node.js This lesson has three main parts to it.
- Number one we will answer the question what is Node.JS.
- Number two I will help you install a node on your computer.
- And number three we will have a hands on demo.
You and I will get to see node in action. We will write a bit of code together step by step should be a lot of fun. So lets start at the top.
Number one what is node to answer that lets talk about javascript first and then circle back to node.
So what is javascript we traditionally think of javascript as a language that only runs within the web browser which means Javascript can only do web browser-ish things, things like opening a modal window or a lightbox on a web page or opening or closing a toggle menu on a page or adding new content to a page without a hard refresh.
Those are all very web browser-ish tasks. We might call them frontend tasks but what about less browser ish tasks and more computer-ish or server-ish tasks things we might call back-end things like creating new folders and files on a computer or servers harddrive things like interacting directly with a database or triggering a server to send an e-mail traditionally to do any of those things you would need to use a language like PHP or Ruby or Python.
You would need a language that can run on a computer and not just run within a web browser which means javascript can’t do any of these things until one day Node J.S. came along and said hey javascript, Yeah, do you want to grow up and wear your big boy pants.
Yes. Yes I’d like that.
Great because you are a legitimate programming language just like any other. There’s no reason you need to be limited to the browser. Do you agree?
I agree.
Cool.
My name’s Node. I just took the javascript guts out of Google Chrome and I used those guts to build a new playground for you that is located on the computer or server itself and not in a web browser.
Within this new playground you can do whatever you want. You have access to the file system you can create files, delete files. You can talk directly to databases you can send e-mails. You can create and serve up your own API. You can do whatever you want.
Sweet, thank you node.
So that’s what node.js is. It is a javascript runtime that lets us do just about anything with javascript. Now you can do a lot of different things with Node but I would say most things fall into one of two camps.
Camp#1
The first camp is when you install node on a server. In this case when the users of your website or app request a bit of data node is what’s actually taking that incoming request and then maybe hitting up a database or hitting up an API somewhere retrieving the data and then sending it back to the user. So in this case node is what is actually powering and serving up your public facing website or app.
Camp#2
The second camp or the other super popular usage of node is to install it on your own personal computer. In this case we are not using node to serve up anything. Instead we’re just using node as a development tool. We are using it to basically create our own little robot assistant. We are using node to automate all sorts of web development tasks that can save us a ton of time. And in this course that is the way that we will leverage node.
All right so now we know what node is. We know why we want to use it. Now we can go ahead and install it on our computers. So let’s get started; search for the Web site nodejs.org. You should see a few download links we are interested in the one that ends with LTS. We don’t necessarily want the newest and most cutting edge version of Node.
We want the most stable version of node. So go ahead and click that. Begin the download. And once the download finishes whether you are on Windows or Mac just go ahead and double click the downloaded file. The installation process is self-explanatory you can just click next next next. Through the installer all of the default options are A-OK.
Once the installer completes let’s make sure that everything was set up correctly to do that I want you to open up your command line.
Type in the following command node space and then dash V.
node -v
Hit enter.
Now your numbers may not match what you see here exactly but as long as you see V and then a few numbers everything’s great you are in business.
If instead your command line replies with a known command or command not found. Don’t panic. That just means we might need to troubleshoot your node installation a bit. If that’s the case for you go ahead and pause this video and check out the text description for this lesson. I’ve included a few common pitfalls and solutions.
All right I will assume that anyone moving past this point in the lesson has Node successfully installed. So at this point we can now move on to the exciting part of the lesson. The third part where we get to see node interaction and we write a bit of code together.
So the first thing I want you to do is to navigate to the generic sites or projects folder that you created a few lessons ago and within that folder create a new folder and name it node-experiment or something similar doesn’t have to be exactly this name but once you create a new folder I want you to navigate to the new folder in your command line.
So I’m just going to type CD space and then I’m going to drag that new folder on top of the command line and hit enter. Next we want to create a new empty javascript file where we can write a bit of code and then have node run that file. So you can use your favorite text editor to create a new javascript file in the new folder or since we have already navigated to that folder in the command line you could just type touch and then the name of the file.
So let’s create a new file named test.js. There it is. So now go ahead and open up this new empty file in your favorite text editor. And let’s begin with a simple hello world example. So type console log in parentheses quotes hello world add a semi-colon.
console.log(“Hello World!”);
Go ahead and save the file. Ok now we want to run this file through node we want node to run the file. So in our command line type node space and then if you are truly lazy you could drag this file on top of your command line.
But since we know we are already in the right directory you can literally just type test.js. So this will force node to run that file that we just created and there we go.
node test.js
So the console replies with Hello world. Let’s try something a little bit more exciting so clear out your text file and let’s try instead. Console log. Parentheses two plus two. Riveting right? So go ahead and add the semi-colon.
console.log(2+2);
Hit save back in the command line. Just run the exact same command node test.js. You might be wondering why seeing the number 4 here is supposed to be exciting. Here’s why.
It’s because it means that whatever we write in this file isn’t merely getting repeated or echoed out to the command line but instead it means that node is actually interpreting and evaluating our Javascript code.
Right so node actually ran the expression two plus two and it concluded that that equals four. So that’s a nerdy way of saying that we can do whatever we want in this file. So let’s try something a bit more exciting.
Let’s write a bit of code to programmatically have node create a new HTML file in this folder for us out of the box.
Node comes with a bunch of modules that can do things for us. So since we want to create a file we want to leverage the node module named FS which stands for file system. So let’s create a variable and we can name it whatever we want. I will call it fs just to make sense but you could name it unicorn or pizza the name of the variable does not matter.
Let’s just say fs though and then we set it to equal and then we can say require. And then this is where the name does matter. So in quotes I will say FS and this is the name of a node module or package.
OK so a semi-colon here and now on a new line we can access all of the tools and methods that live within this file system package.
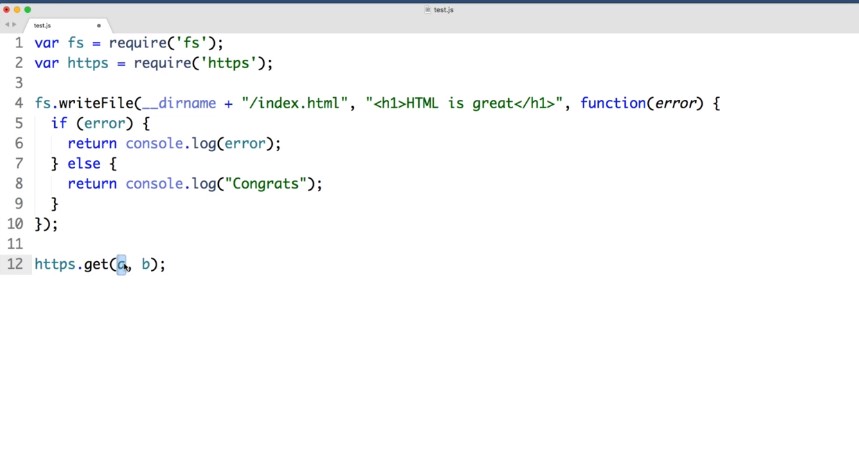
By just saying FS This is now referencing our variable name that we created. So fs dot and then it contains a method named right file and we want to get this right file method 3 things.
So just as placeholders we could say A comma B comma C, right. So we want to give this method three arguments. ow back to the task at hand. Remember we want to create in HTML file within our folder.
Now the first argument is the location on your computer where you want to create the new file. So instead of a let’s say underscore underscore Dir name which stands for directory name.
This will tell node to look within the current folder and then right after Dir name we can add on and then quotes and then within the quotes. Let’s say forward slash and then the name of the file that we want to create. So maybe index.html. OK so this is the first argument.
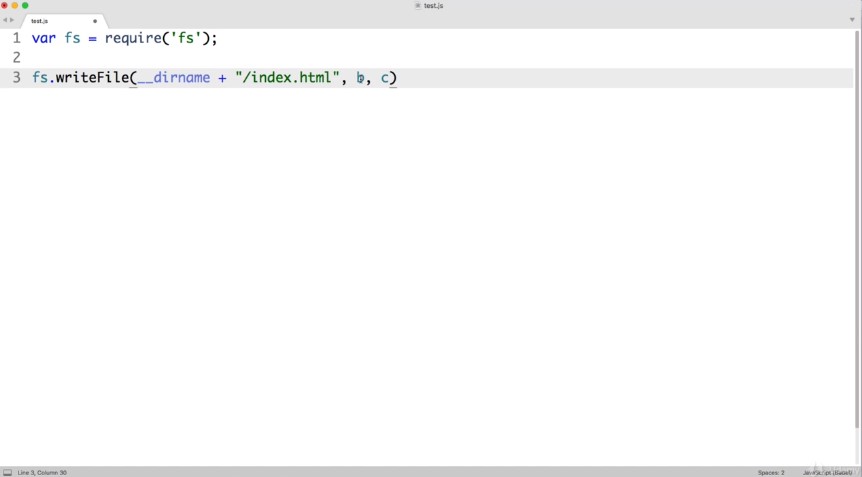
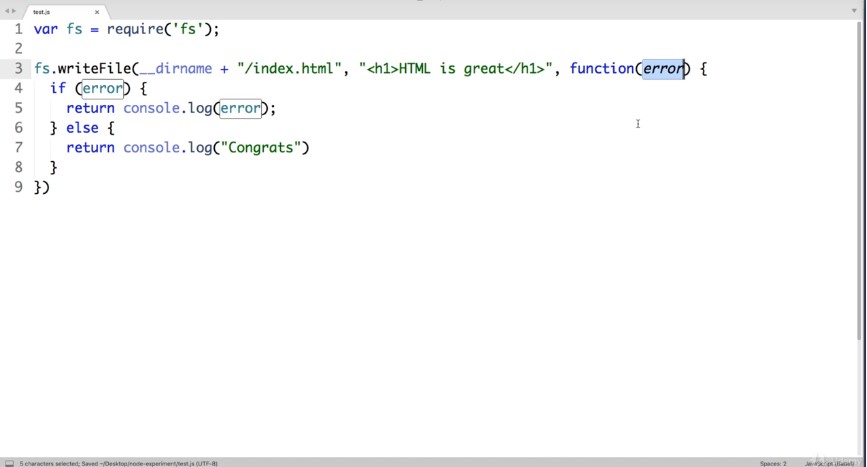
The second argument is what you want to live within the file. So instead of this placeholder B I will provide a string of text so quotes and then let’s imagine we want to create in HTML headline so heading level one, close out the tagging within the tags. Let’s just say “<h1>HTML is great.</h1>”
OK and then finally for the third argument instead of this placeholder see we want to include a function that will run once our write file action has either succeeded or failed. This is commonly referred to as a callback function.
So at the end where are placeholder C was let’s say function and it gets its own set of parentheses and then right after those curly brackets within the curly brackets Let’s drop down and let’s write an IF statement.
So if parentheses curly brackets. Let’s say if there is an error so if something goes wrong and for some reason our file cannot be created, if that’s the case then within these curly brackets we can say return console dot log parentheses error.
So if there’s a problem this way we can see the problem in the command line and then right after the closing curly bracket for our if statement we can say else otherwise if there’s not a problem within these Curly brackets we can just say return Konsole dot log and then quotes for a string of text and let’s say congrats meaning everything worked perfectly and your file was created.
And finally before we save this file if we’re going to be referencing a potential error that occurred we want to be sure to include that as a parameter when we first say function. So within these parentheses let’s include error as a parameter. And now let’s save this file and test it out.
So over in the command line node test.js
Congrats.
And if I check my folder sitting alongside or tes.js we now see index.html, and if I open it up in my text editor cool we can see that it contains our content. Now let’s change gears and try one more note example before we bring this lesson to a close. So up next let’s make it our goal to use node to programmatically download and save an image from the Internet.
So for example we need a URL for an image that lives on the Internet. So if you want to follow along with me you can visit github.com/LearnWebcode/welcome-to-git
And I’m just going to dig within this images folder and then click on dog.jpeg and this URL will not work because this is still a web page.
But if you right click on the dog photograph and choose view image this is the type of URL I’m looking for.
Now you do not need to use this exact photo of a dog. Any image URL on the Internet will work just fine.
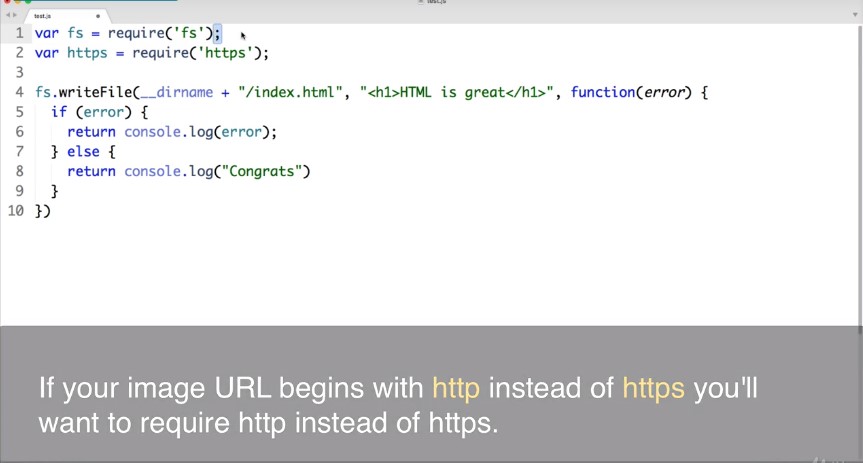
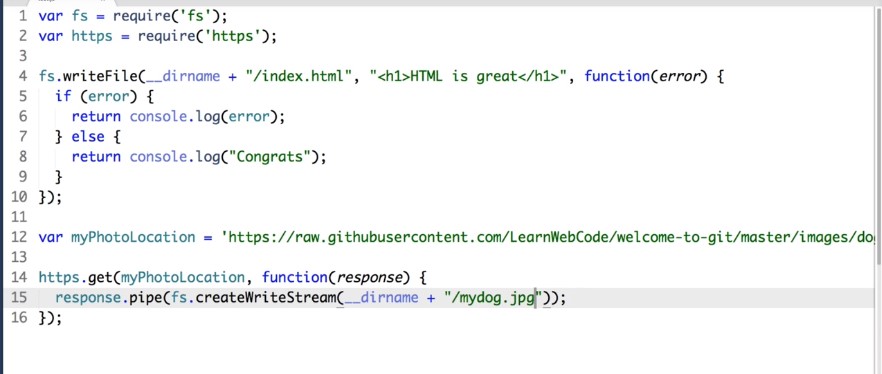
So go ahead and copy an image you are l into your clipboard and let’s say that our goal is to use node to programmatically save this file to live within our folder. So back in our code back in our test.js file in order to send out a request onto the Internet, I’m going to want to include another node module or package.
So up towards the top let’s create a new variable we can name it whatever we want but just to make sense I will name it https and set it to equal and then I want to require in or include in parentheses quotes a node module named https and just a quick note on semi colons in javascript, 99 percent of the time they are not necessary but a lot of developers consider it just a best practice to be consistent and include them at the end of a statement.
It’s a bit of a personal preference because some developers hardly ever use semi-colons. But if you’re going to use them you should probably be consistent. So you’ll notice that on this line I forgot to include one at the end. Nothing breaks without it. It’s just something you want to be consistent with and technically you can include one at the end of this line as well.
OK. Back to the task at hand. We want to leverage this HTTPS module to download and save this dog photo. So down at the bottom of our code now at the very bottom let’s add a new line and let’s say HTTP s to leverage that new module and look inside it with a dot and it contains a tool or method named get.
We want to give this method to things. So within the parentheses as a placeholder we could say a and b.
Right. Two arguments the first argument is that URL that you want to work with. So technically we could include quotes here and then paste in our clipboard but our URL is so long that it would take up almost the entire screen.
So instead why don’t we do this right before this line. We could create a variable. The name doesn’t matter. But I’m going to name it my photo location and set that to equal and then quotes and now paste in your clipboard.
Cool. So you can see that that path is really long. And just to keep this line of code clean. Now instead of the placeholder a we can just say my photo location right that variable will pull in the photo URL and then the second argument for this get method instead of the placeholder B. We want to include a function where we say what we want to actually do with the photo data.
So let’s say function parentheses curly brackets within those brackets let’s drop down and this Git method is going to pass along any data that lives at our URL into our function. So it within our parentheses lets out a parameter we can name it anything. But why don’t we call it response. And now on this line within the body of our function we can do whatever we want with that data. So let’s say response and then we want to pipe it or send it somewhere.
So dot pipe() and what do we want to do with it. Well we just want to save it onto our computer within this same folder. So within these parentheses let’s say fs to use the file system and then a dot to look inside it.
And let’s use a method named create. Right. Stream it gets its own set of parentheses and within the parentheses we just want to provide a path to where we want to create the file. So I will say underscore underscore dir name to point at the current folder and then add on a string of text and save forward slash and then you can name the file whatever you want to name it.
So I would just name it my dog.jpeg.
Cool. OK so now we can go ahead and save this file.
And back in our command line let’s run node test.js push enter.

And if we go and check our folder cool there is our my dog photo. And if you open it up perfect and that marks the end of this hands on no demo we didn’t do anything earth shattering with node but hopefully you can see the potential if node can access our file system and if node can go onto the Internet and grab files for us that means we can automate all sorts of things.
And the good news is that we don’t need to write a bunch of code to create that automation. We wrote code in this lesson just because I wanted you to see how Node works at its most basic level but writing code for very basic tasks like we did here is not an efficient use of our time on Earth.
Instead we can leverage code that other super intelligent people have already written and have already shared with the world. Which brings us to the topic of our next lesson.
This is exactly where NPM comes into play.
And in our next lesson we will learn what NPM is and how to get started using it. It’s going to be a lot of fun and I will see you in the next lesson.
