
Hello everyone in this lesson on Git you will finally get your hands dirty. This is the lesson where I want you to start following along step by step on your computer. We are going to do a few things in this lesson.
- Number one I will help you make sure that Git is installed on your computer.
- Number two I will help you find the command line on your computer.
Yes I do actually want you to use the command line.
(recommended: download GitBash)
That program that reminds you of computers from the 80s using the command line will give you a stronger understanding of how it works. A lot of jobs will expect or even require you to use Git from the command line.
And a lot of the other technologies that we will be learning about in this course. Things like node NPM, Gulp all of these things use the command line as well.
Now there’s nothing to be afraid of; the command line is way less intimidating than it might seem at first.And we’re going to get our feet wet and walk through things step by step together.
- And number three we will try out a few get commands together.
All right let’s get started. Now this process of installing get and finding the command line is a bit different depending on whether you are using a Windows based computer or if you’re using a Mac.
Either way this lesson has got you covered.
Let’s begin with the Windows side of things and then we’ll hop over onto the Mac side. If you are using a Mac you don’t need to download anything. So please ignore the following windows instructions.
So if you are running Windows open up a web browser and head over to git-scm.com
If you perform a Google search for simply Git this should be the first resort.Here is what the Web site looks like and what you want to do is come down to this teal colored computer and there will be a download button.
Now I’m on a Mac so it says downloads for Mac but on your computer it should say download for Windows or something similar to that.
Go ahead and begin the download and when it finishes open the installer file. From here it’s very self-explanatory so you can pause this video right now and just click next next next through the installer.
All of the default options are A-OK once the installation is complete , come back to this video and unpause it.
OK welcome back.
I will assume that if you’re watching this part of the video you’ve installed get the next step is to click on to your start menu or wherever your full list of programs is and look for Git. But more importantly I want you to look for the program named Git Bash.
This is the command line that I want to use throughout this course so whenever you hear me say command
line I want you to think GitBash, the GitBash program.
So right now go ahead and open the GitBash and once you’ve done that pat yourself on the back, you have installed get and you have found a working command line for all of you Windows users you can now skip ahead a bit in this video because right now we are going to take a look at the Mac side of things.
OK so on your Mac you are looking for an application named terminal. One of the simplest ways to find this app is to go in the top right corner of your screen and click the magnifying glass and then start typing the word terminal.
Go ahead and hit enter or return and there’s your command line.Now your terminal might not look exactly like my terminal visually. But rest assured you’ve got all of the functionality that you need.
If you do want to customize the color scheme in appearance of your terminal check out the description for this lesson I will include a link to a guide on that.
But let’s not worry about appearances right now. Instead let’s focus on making sure that get is installed on your Mac.There’s a very good chance that it is already installed and to make sure just type in this command at your command line:
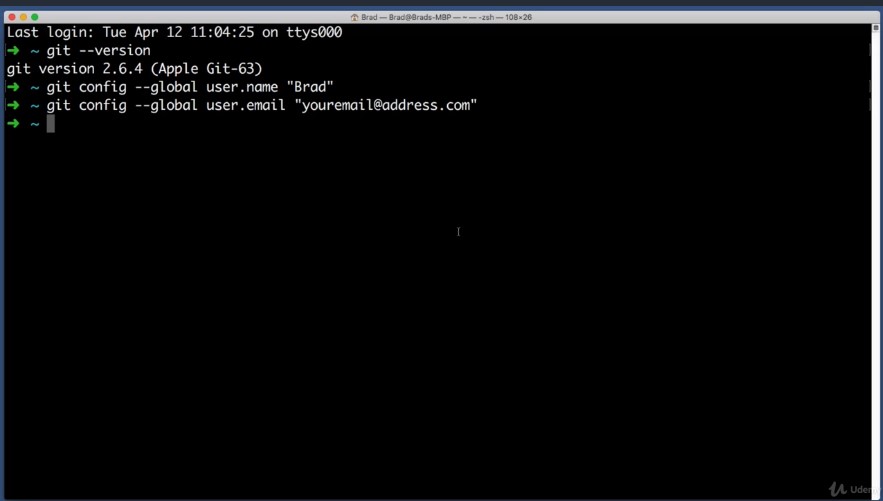
git –version
and hit enter as long as you see something along the lines of git version 2 dot number number, you are in business. you’re good to go.
If Instead you get a response of command not found or unknown command, that means that it is not installed and you’ll just want to go to the git-scm.com web site and just like we did for windows earlier. You want to download get for Mac. So go ahead and pause this video if you need to install get on your Mac and then come back and resume the video once you’re good to go.
All right, so at this point in the lesson now everyone watching whether you are on a Windows computer or a Mac has Git installed and you have opened the command line.
This means we are all on the same page. We are all on even footing so now we can walk through a few good steps together.
All right, let’s begin by personalizing a few of your settings. When Git track your changes it also tracks who is making those changes. So we want to let get know about your name and your email to type this in
git config –global user.name “Brad”
you would type in your name but I’ll type in mine. Hit enter.
next we want to do the exact same thing but with our email address instead of our name.
So the command is very similar it’s:
git config –global user.email “Brad”
get config dash dash global user dot email and then just type in
your e-mail address your email address dot com but you’d put in yours.
Hit enter.
All right so now your copy of get is all set up and ready to go.
Now we can have Git actually do something.
So the first thing I want you to do is create a new folder on your computer somewhere it can be anywhere can be on your desktop or folder of your choosing. But I want you to name this new folder or something generic like projects or sites once you’ve created a new folder.
Our next step is to navigate to that folder from within the command line the command line is always working in or pointing towards a directory or folder on your computer. And we can change where your command line is pointing very freely. We can see where the command line is currently pointing towards by typing
pwd
This means print the working directory. So it looks like my command line is currently pointing towards the user’s Brad directory. But I want it to be pointing towards this new sites for there we just created. So what I’m going to do is type:
cd
This stands for change directory and then I enter a space and instead of trying to type out the location for this folder what you can do is actually just drag the folder that you just created a moment ago. On top of the command line I will hit enter. And now I can try pwd again to print the current working directory. You don’t have to run pwd, I do it just to make sure I’m in the right place which I am.

All right so once you’ve navigated your command line to the folder that you created just a moment ago, we want to create another folder for a particular imaginary project. Now we can create a folder from the command line by typing
mkdir stands for make directory, space quotes and then I’m going to title this new project hello-world. Hit enter. OK so all that did is within the folder recreated a moment ago it created a new folder named hello-world.
Let’s begin an imaginary good repository within this hello-world folder. So first we want to navigate in to the hello world folder. So to do that CD for change directory and then hello world. Or another way of navigating to that hello world folder would be the type CD space and then do what we did earlier which is just drag that hello world folder onto your command line.
So that’s the same exact thing.
Now here is the moment of truth. Here is what we’ve all been waiting for.
Let’s tell get to begin tracking anything that happens within this hello world folder or in other words let’s create a brand new repository. All we do once we’ve navigated to the folder that we like typing git initialize.
git init
Hit enter and you’ve just created your first repo. Let’s test it out. Let’s make sure that it’s tracking changes so let’s create a super simple HTML file we can actually create new empty files from the command line by typing touch and then the name of the file that we want to create.
So let’s try.
touch “index.html”
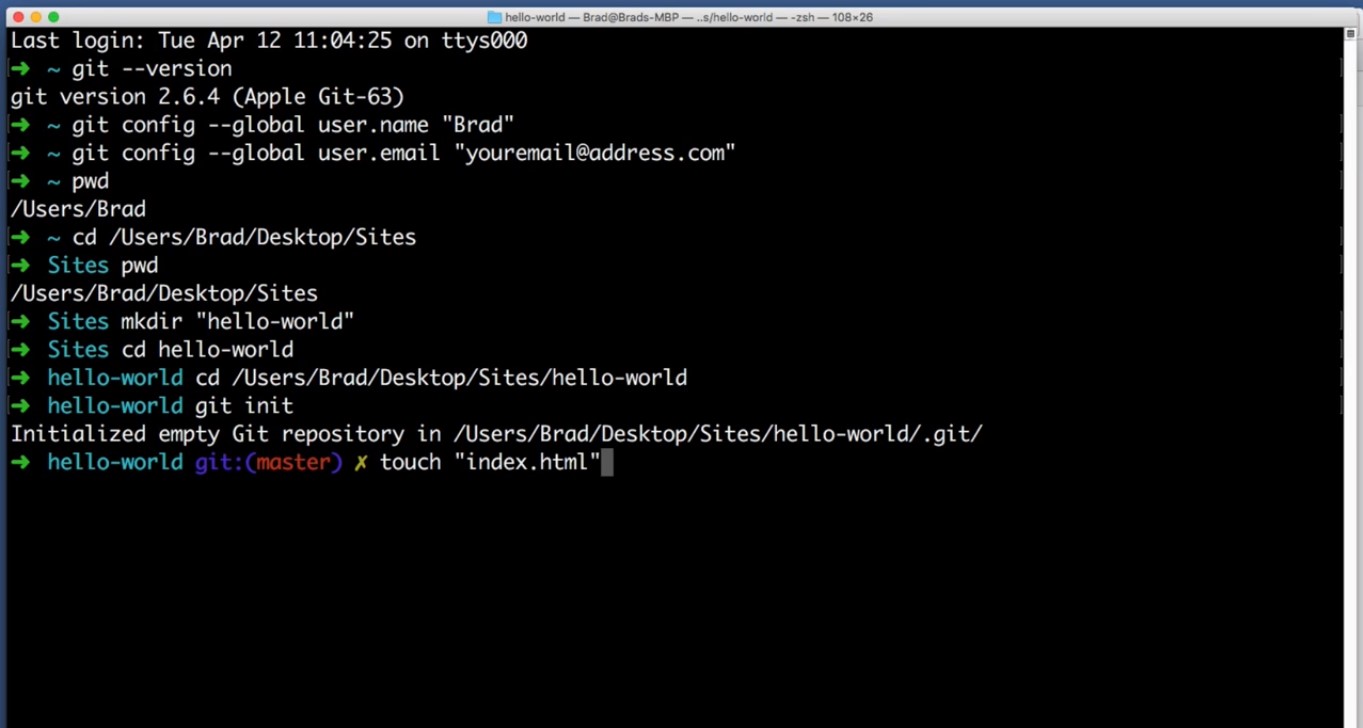
Hit Enter. If we navigate to Hello World. There it is.
So go ahead and open this new file with your favorite text editor. We don’t really need anything in this file but just to prove a point I will create an H1 and say Hello World. Go ahead and hit save.
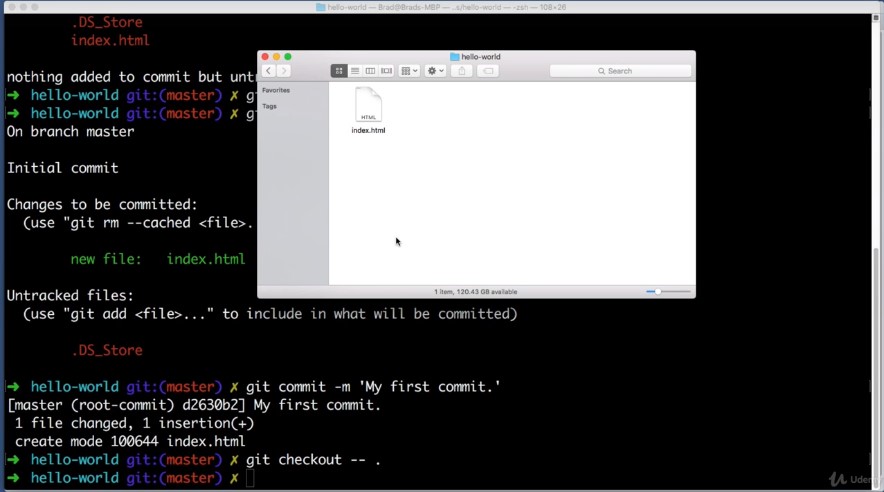
Now back in the command line. If we type git status Git tells us that I’ve made two changes to the folder.This is a system file on Mac and we will learn in the future how to tell get to ignore that completely.
But we see that the only other file that’s changed is the index.html file that we just created.
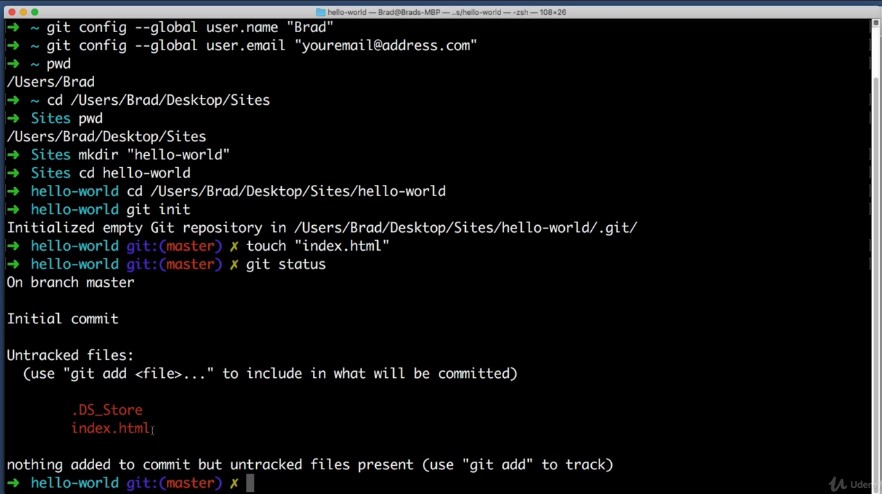
So we want to add this to the staging area so that we can commit it.
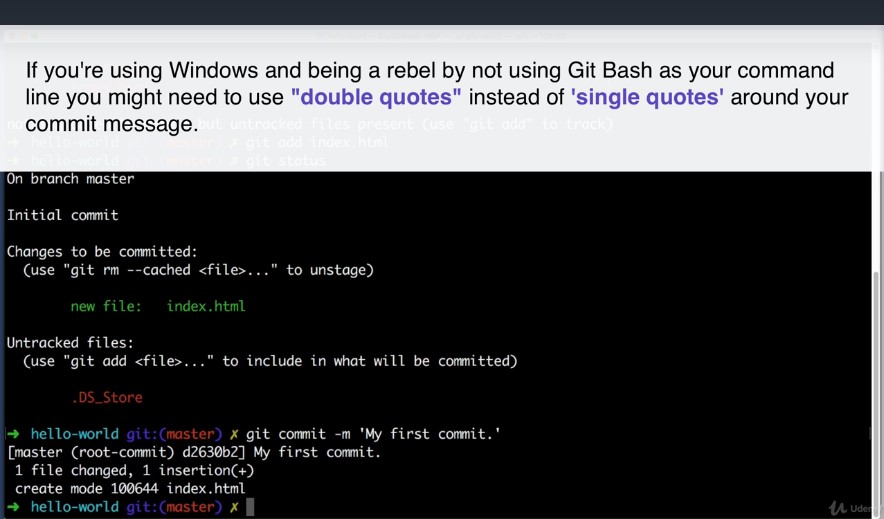
So I will type git add and then the name of the file that I want to add to the staging area is so
git add index.html
We can try to get status again to see how things are looking. Changes to be committed. Yes this is the only thing that I want to commit.
So this staging area looks good so I will type
git commit -m “My first commit.”
I will include a message my first commit hit enter and congratulations you just made your first commit to a repo.
Now let’s really drive home the point of why that’s cool which is because now no matter what happens to your files you can always revert to the way that files were when you just made this commit.
So for example maybe your cat walks on your laptop and hit save. Or maybe that file simply gets deleted entirely.
Now all we need to do to restore our files back to that commit or back to the last commit would be to type
git checkout — .
get check out dash dash space and then a period hit enter and that’s all that it takes to restore the files back to the way they were when we made our commit index that each else back. And that’s without that line of cat jibberish at the bottom.Excellent.
OK.
Now this lesson is almost complete but there’s one small fun section at the very end here. But before we get to it I want to recap what we’ve learned so far so far. We’ve installed get on our computer. We’ve opened the command line. We learned how to navigate to a particular folder and create a brand new repo.
And we made our first commit. Now really quickly I want to point out that we created a brand new repo from scratch. And while that can be useful I think more often than not what you’ll do instead is you want to clone an existing Repo from a server to your hard drive.
So for example let’s imagine that you and I are coworkers and I’ve been working on a Web site and I want you to help me.So the Web site already exists so you wouldn’t create a brand new repo. Instead you would want to take the existing Repo that already exists on a server somewhere and clone it or copy it to your computer.
And that is exactly what we are going to do. In this last section of the lesson it’s super simple. So back in the command line I want you to navigate to not the hello world folder but to the main sites or projects folder that you created in the beginning of this lesson.
So I will type cd space and then I will drag this site’s folder onto my command line.
Hit enter.
And now we can pull down an existing Repo with one command we just type
git clone
and then here’s an address that you can type in HTTP s colon forward slash forward slash get hub dot com forward slash
learn web code forward slash welcome dash to dash get dot get hit enter.
git clone https://github.com/LearnWebCode/welcome-to-git.git

And now if you look within the sites or projects folder that you created in the beginning of the lesson you’ll see a new folder named Welcome to get you just clone this from the server.
So go ahead and try to open up the index.html in your browser to do that. You can just drag this file on top of an open chrome or Firefox or Internet Explorer or Safari window. There will be a friendly surprise waiting for you.
And that’s where this lesson will come to a close in our next lesson.
I will help you create a free get hub account and we will get started on the real meat and potatoesof this course.
We will begin building the mobile first web site together and you will be able to commit and push your progress at the end of every lesson up to your own personal get hub repo. It’s going to be a lot of fun.
This is where things really start to take off and I will see you in the next lesson.
