
Hello everyone in this lesson you will get started with GitHub.
We have two main tasks in this lesson.
- Number one you will create your own personal get her account and
- number two you will create a new repository on your computer.
And this is the repo that you will be working in for the remainder of this course. This is the repo in which we will build the mobile first web site together.And by the end of this lesson this new repository will exist on both your computer and on Github servers tied to your own personal account so that you are able to push your progress to the server at the end of each lesson.
All right let’s get started. The first step is to create a GitHub account. So open your web browser and go to github.com
from the github home page you can see there are three fields here. Pick a username, your e-mail address and create a password. Go ahead and fill those out. Click sign-up for Github.
And if you are asked whether you want a free personal account or a premium account just know that we are interested in the free account.One of the main reasons that someone would be interested in the premium account is if you needed a private repository, in this course a public repository will do just fine.
And I do want to point out that a public repository doesn’t mean that just anyone in the world can push to your repo without your permission, even though it is called a public Repo only you will have permission to push changes to it.
In this context the word public just means that everyone in the world can see your code. So when you are working on a public Repo you don’t want to push any files that contain passwords.
Now this will not be a problem in this course because none of the files we create will contain passwords but if you are working on a project in the future that does involve config files with passwords you might consider a get a Github premium account.
Or you can use a free service named bitbucket and they do offer private repos for free. OK with that public service announcement out of the way for this course a public Repo will do just fine which means a free account will do just fine. So go ahead and complete the registration for your Get hub account. Go ahead and pause this lesson while you create the account and once it’s created come back and resume the video.
Welcome back.
If you’ve made it this far in the lesson I will assume that you’ve created a Github account and that you’ve signed in to that account in github.com.
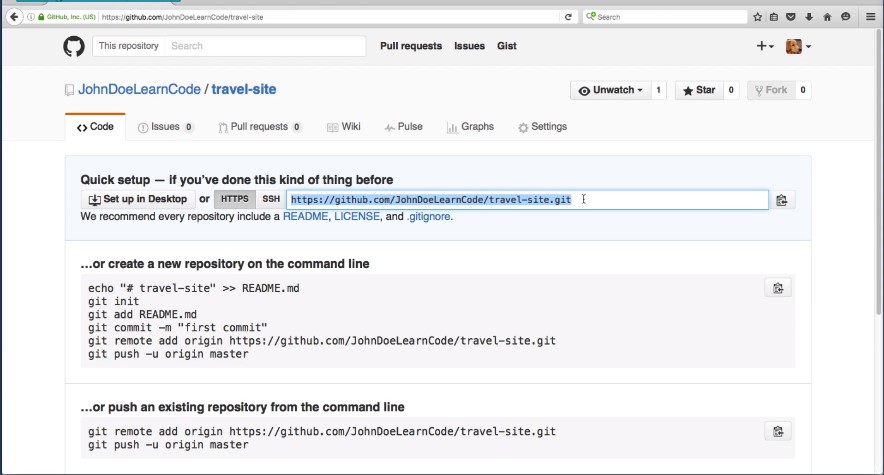
The next thing that we want to do is to create a brand new repo on Github servers.There are several places where we can create a new repo, but let’s try this one in the top right corner of the layout You’ll see a plus symbol. Go ahead and click that and then click new repository that will take you to the screen where we can create new Repo.
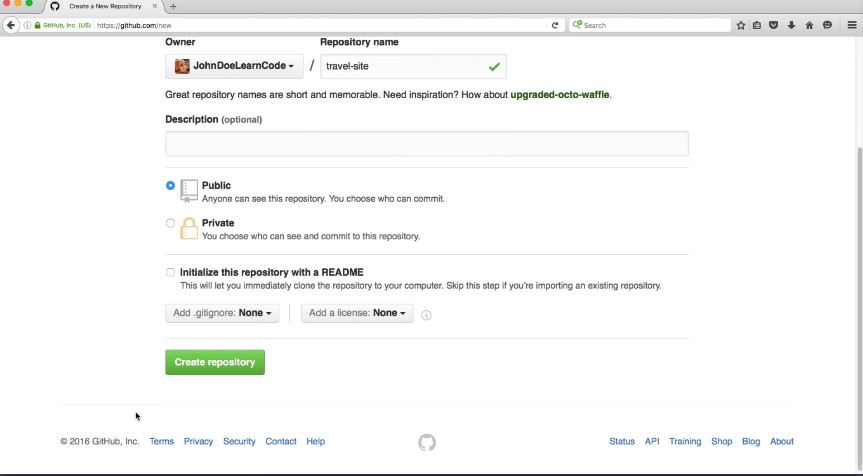
The first step is to choose a name. Now you could name this anything you would like completely up to you. The Web site that we are going to be building together in this course is for a fictional travel agency so you could name this Repo travel site. Something along those lines. Be sure to use dashes instead of spaces in your name but feel free to name the repo whatever you would like. We can leave the description blank for now.
Make sure that this is a public Repo. Next we see an option named initialize this repository with a readme. This is often a very useful feature but in this specific instance we are going to leave it unchecked. You can see the instructions say skip this step if you are importing an existing repository which is exactly what we are doing today.
We just want an empty shell of a repo on get Hub’s servers. So leave this unchecked and then scroll down and click Create repository that will take you to the screen which is the overview for the brand new repo.
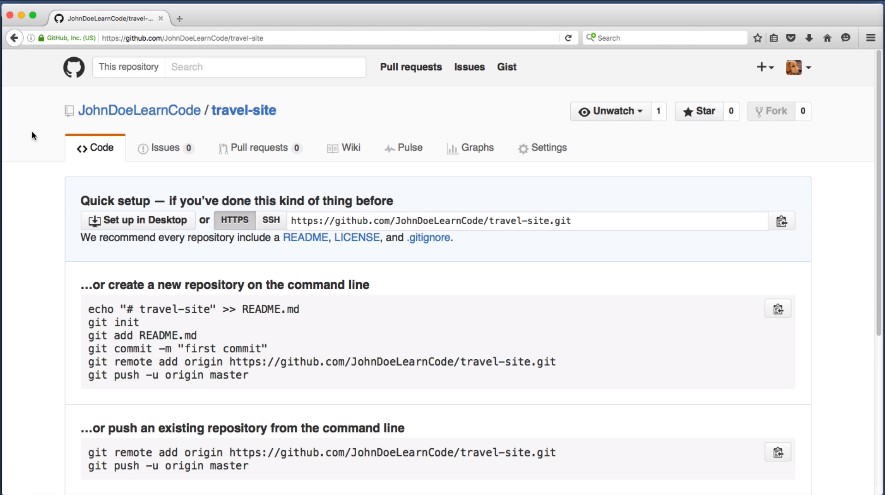
And at this moment this repository is completely empty. It’s an empty shell of a repo on git hub servers and it is waiting it’s just waiting for us to push something up to it. This means that our next step is to create a new repository on our computers hard drive and then once we’ve created it we can push it up to git hub. So let’s do that right now.
Let’s create a new repo on our computer in our previous lesson. I had to create a folder with a generic name like sites or projects and that contains the different repos that we’ve been working on now instead of creating a new folder and running get in it and creating things by hand I want to save you some time.
So I’ve created a repo that you can clone down to your computer and it will give you all of the starter files for the site that we are going to be building together in this course.
So what I want you to do now is open your command line. The first thing I want you to do in the command line is to navigate to that generic sites or project folder or whatever you name wherever you’re keeping it on your computer.
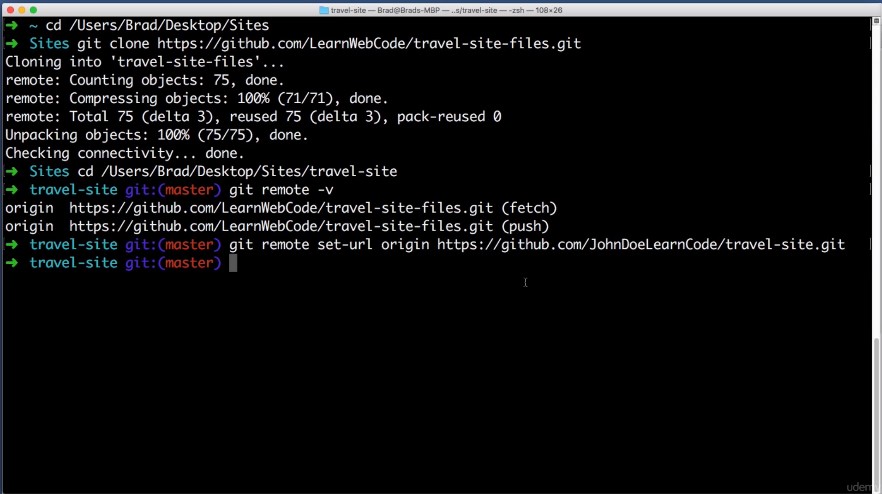
So in my case I would type cd space and then I’m just going to drag that folder onto my command line and hit enter. Now that we’ve navigated to that directory we can clone the repo that will give us the starter files so to do that type in this command good space and then clone space and then type in this address https colon forward slash forward slash get a dot com forward slash learn web code forward slash travel dash sight dash files dot git and then hit enter
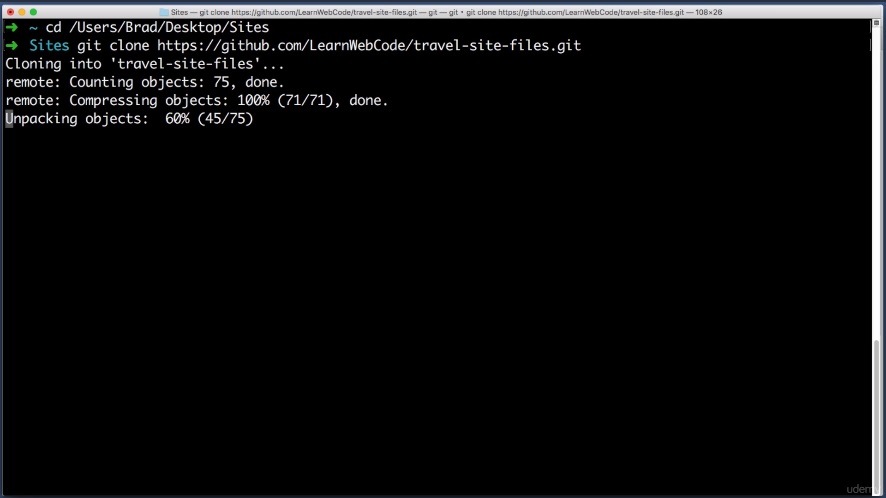
that command might take a moment to complete but when it does if you check the generic sites or projects folder you will notice a new folder named travel site files which I want you to immediately rename this folder to whatever you named the github repo you created just a moment ago.
So for example the empty Github repo we just created. I named mine travel site. You might have named it something else but whatever you named it you go ahead and make this new folder match that in name. I’ll change mine to just travel site OK.
And you might be wondering what’s in this new folder. Well, it contains starter files for the website that we are going to be building together. So here’s an HTML file; this code is currently not even importing any css or javascript.It’s just bare bones HTML now that we can work on together. You can see that most elements don’t even have classes yet. there are zero styling. The whole point of this file is just so you don’t have to type in dummy lorem ipsum some text and so that we are working with a common base so that you and I are starting on the same page and we can move forward together.
The repo that you just cloned also contains an assets folder inside that folder is a folder named images and these are all of the image files that we will be using on the Web site.
Excellent. Now we only have one remaining task in this lesson and that is we want to take this new repo on our computer named travel site that contains the starter files and we want to push it up to github servers.
We want to push it into the empty shell of a repo that we created earlier in this lesson and to do that we need to hop over to our command line let’s navigate to the new repo on our computer so I’ll type CD space and then I’ll drag this file there.
But again you might have named it something different but the people that we just created on our computer, go ahead and drag it on top of your command line and hit enter.
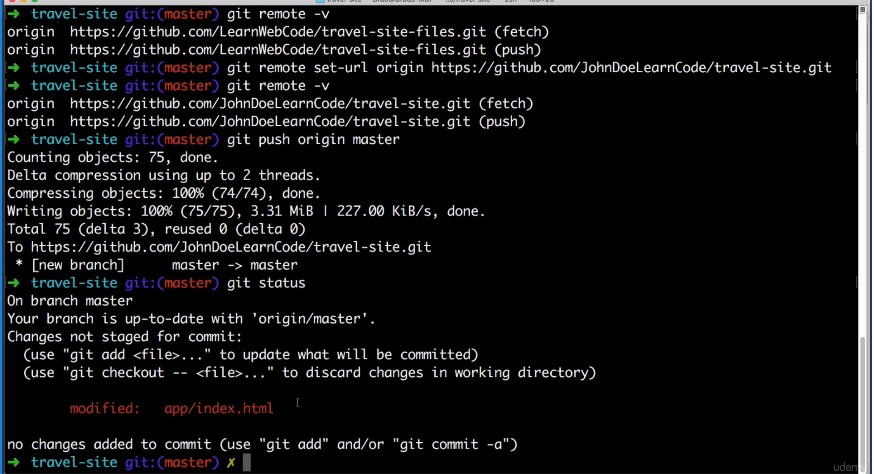
OK.Now we want to push this report up to the github servers but because we cloned this Repo from an existing Repo Git would try to push it to its original destination.
So for example if you type get remote and then a space dash V and then hit enter and get we’ll show you the server address of where it thinks you want to push to.
git remote -v
(be sure to cd to the work directory)
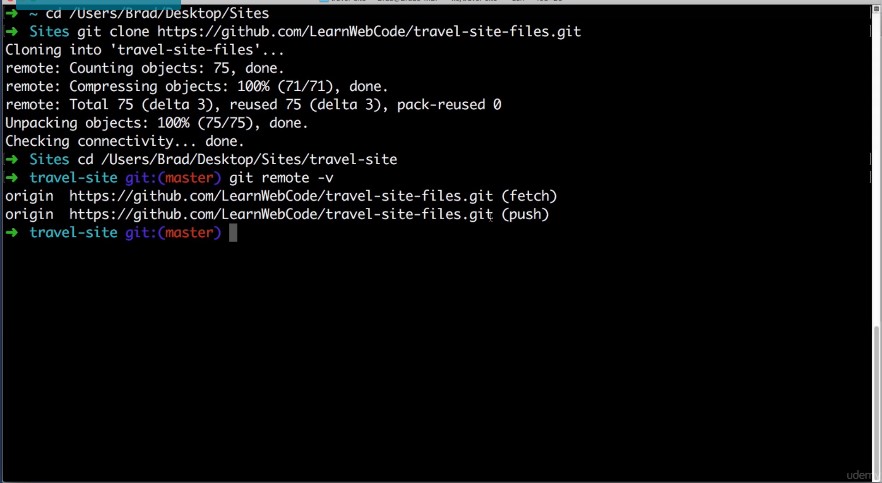
So this is the location for the starter file Repo that I personally created but that’s not where you want to push. You want to push to your personal empty shell of a repo that you created at the very beginning of this lesson.
So we want to update this address to match your github.com repo address which is very simple. So on the overview page for the empty shell of a Ribault that you created you’ll see this address here.
Go ahead and copy it to your clipboard.
your address will not match this one. Yours will include your username instead right here and it will include the name of the people that you choose here. But once you’ve copied that to your clipboard head back over to the command line and type this command:
git remote
get remote set-url origin and then paste in that you are all that you just copied on Windows, sometimes it can be tricky to paste into the command line.
If that’s the case the address isn’t that tricky it’s just http Git hub dot com your username slash and then the name of the Repo dot git. go ahead and hit enter.
git remote set-url origin https://github.com/LearnDoeLearnCode/travel-site.git
And let’s make sure that that command went through successfully.
So to double check we type
git remote -v
what we want to see is your username here and then the name of the Repo that you chose here. If that’s the case we are in business.

So now whenever we get to push to the origin it knows that the origin is your github.com repo.
So here’s the fun part. Here’s what we’ve been waiting for.
Now I want you to run this command: git push. We are ready to push. Type in origin origin just stands for the address of your Repo and then type in Master because we are on the master branch; we will learn about branches later on. But go ahead and hit enter.
git push origin master
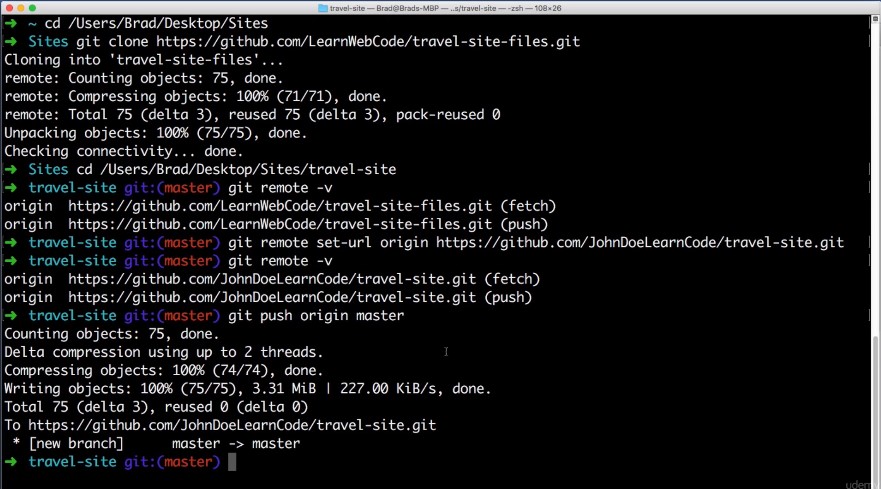
At this point your command line will likely ask for your Github username and password. Go ahead and enter those when prompted. Rest assured that you will not need to enter these every single time you push.
This is a one time event for this very first push. This might take a moment because it is indeed uploading many different image files.
But once the command completes go ahead and refresh the github.page for your repo and now the repo that we set up in the beginning of this lesson is no longer empty.
It contains the starter files that we will be using to build the Web site in this course.

Now really quickly let’s practice making a super basic change to the HTML file. So on your computer navigate to the generic sites or projects folder navigate to the new repo that we’ve created in this lesson drill down into the app folder and then open this index thart HTML file in your text editor of choice.
You can use the file open functionality of the text editor or in a lot of editors you can just drag this file on top of the text editor.
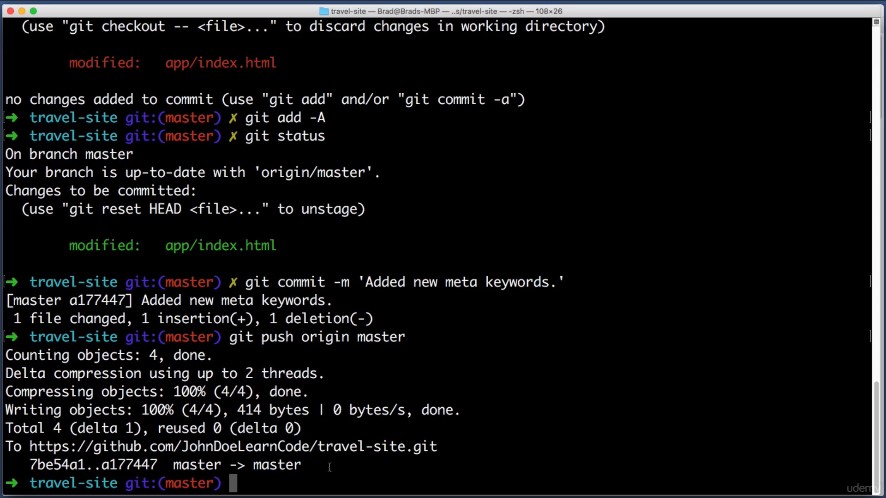
Let’s make a super trivial change just to practice pushing a change up to github. So for example let’s add a few new keywords in the Meta head section of the Web site.
So I find this line of code in your HTML file and at the end add a comma and type Affordable travel, save your change hop over to your command line type git and then a space and status.
git status
This looks correct. The only file that we modified was the index on HTML file. So I want to stage all of the changes so I will type get add dash and then uppercase a.
git add -A
If we type get status again you can see that that file has been staged which means it’s ready to becommitted.
So now I can just type git commit dash m let’s type a message added new Meta key words.
git commit -m “added new meta keywords”
All right so now we have committed that change into the local copy of the repository on our computer. Now we want to push our repo up to get Hub’s servers.
So just type get push origin master hit enter
git push origin master
back in your browser open up the github overview page for your Repo, refresh the page and here you should see your username and if you have an avatar it would be here because you are the one that has made the most recent commit.
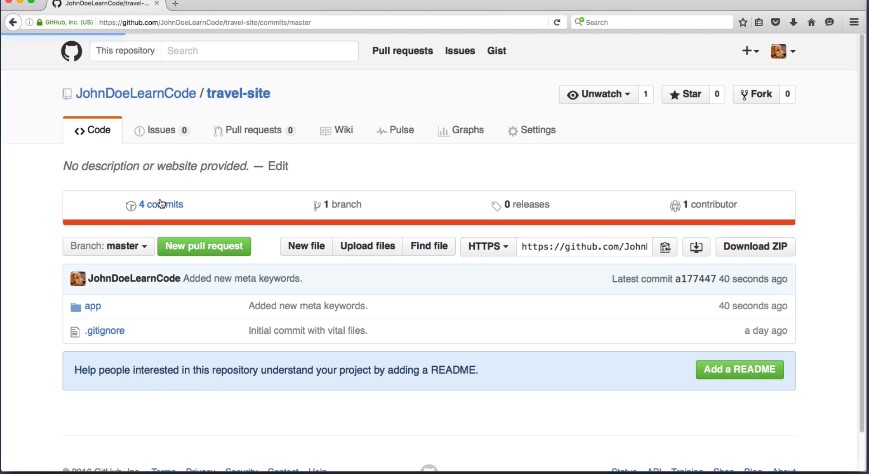
You can click on commits here. And your change will show up you can even click on it and Github will highlight in green the text that you just added.
And that will bring this lesson to a close. Let’s review what we took care of:
- We started out by creating a good hub account then we created a new empty Repo and Github’s server.
- And finally we pushed the starter files for our Web site from our computer up to Github server.
- And now when we worked through future lessons we can push our progress up to that Repo at the end of every lesson. So even if our computer blows up our files will be safe on the server.
Excellent. In our next lesson we will be changing gears. This marks the end of the intro to Git section of the course, In the next section we will begin to learn about other technologies and tools that we will leverage as we build out the fictional travel agency Web site together.
The first tool that we will learn about is named Node and we will learn what node is and what it’s used for in the next lesson. It’s going to be a lot of fun and I’ll see you then.
