In this tutorial we’re going to pick up where we left off and continue learning more about inheritance. So to get started let’s close our default package and right click the source folder and we will create a new package. Let’s call this package overriding and click Finish.

Now let’s Right-Click our overriding package and select new class and create a class called Base and click Finish and let’s do the same thing again create a new class and we name is one Subclass and click Finish.
And as you might expect we’ll have our subclass extend base and let’s throw in a comment about the class definition to remind ourselves what this is doing. So
// Subclass is inheriting all the variables and methods defined in base.
So in the last tutorial I had our child class inheriting a variable from our parent class and this tutorial we’re going to inherit a method. So let’s go over to our base class and create that method. Let’s say public void say hello.
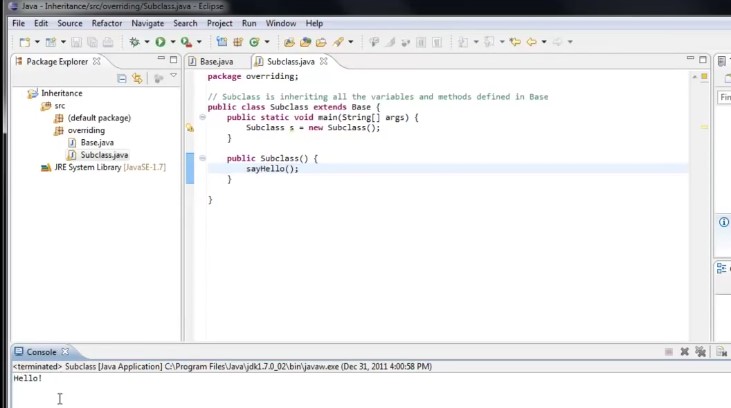
And inside of a method let’s do a Control spacebar and we will print out Hello. And now let’s have our subclass call this method. So we’ll go back over to subclass and let’s create a main method by typing in Syso and pressing control spacebar hitting enter.
And now let’s create a new instance of subclass by saying subclass s equals new subclass which we’ll call the constructor.

Right. We will create the constructor by pressing control spacebar and selecting default constructor. And now just as in the last tutorial with our J frame we have access to the methods that are defined in the class we’re inheriting.So we can simply call or say hello method and sure enough if we run the application we’ll see that Hello! is printed out to the console.
So it’s happening on this line is we’re calling the say hello method defined in base. So you might remember from the last tutorial when I pressed control spacebar to bring it code ending, we have these options to override methods that we’re inheriting. And sure enough here’s our Say hello method and we can override it from the base class.
So what happens when we select that. You’ll see that Eclipse generates the method for us.And as of right now everything works exactly the same as it did before. If we were to run the application we would see that Helo’s still printed to the console.
So now if you look at the method body will see this super.say hello. And all this is doing is actually doing the work to call that method from our base class.
And so the key word super means if you remember using the key word this to refer to this instance in this case it would be this instance of subclass. What super does is it refers to the instance of the class that this class extends. In other words Super here would be an instance of base. So it makes sense that we are calling our Say hello method on that base instance.

But for now you don’t have to worry about Super too much. Let’s see what happens if we do another syso and print out Hi. And now we run the application.See that both hello and high get printed to the console.

So when our constructor runs on our Say hello method is called We are actually jumping into this method now which is defined in our subclass rather than in our base class.
And what this method is doing is saying call the method in our base class and then do a system out.print line and print out “Hi!.”
So we’re overriding a method allows you to do is to define a method that you’re inheriting in your subclass and either add to or completely change its functionality.
For example if we commented out the superdad say hello line our functionality would be completely changed. So we run the application only hi!as printed out. That means we’re not even running the method in our base class anymore.
So now that you hopefully have some idea of what’s going on here it’s time to have some fun.Let’s create a new class in our overriding package and let’s call this class drawing and click Finish
Now drawing we’re going to extend jFrame and let’s create a main method by taking me and pressing control spacebar hitting enter and let’s create a new instance of drawing and let’s create the constructor.

And now we have just as in the last tutorial Jframe window to work with. And as in the last tutorial let’s set the size to 500 by 500 and set the visibility to true. And now if we run the application sure enough there is our window and now comes the fun part.
We are going to override the method that’s coming from the jFrame class that controls what is drawn inside of this frame. And that method is called paint.
So if we open up code hinting you can see that one of the options is to override the method called paint.

So let’s select that.And right now just as before if we were to run it right now everything works exactly the same.

Now let’s see what happens if we comment out the super.paint method call now you’ll see it’s a little bit different. We no longer have our gray background. Now the background is just white.
So what we’ve just done is completely removed all of the inherited functionality of our paint method and now we can define our own custom functionality to say how we want this window to be painted.
Now if we take a look at this method you’ll see that it expects a parameter of type graphics. Now graphics is an object just like the ones we’ve created and worked with in the past and all we need to do is learn how to work with this graphics object to control what is painted inside of our window and we can see that our graphics object is referred to by this local variable g.

So if we were to say g. and look at the code assist we can see some of the methods we can call on that graphics object. Now there’s all kinds of options here.

We can draw images we can draw strings and polygons.
I think the good one to start with would be g.drawRect short for a draw rectangle and you can see that this method expects 4 parameters: it wants int integer x and integer Y which controls where on the screen it’s going to be placed and it expects an integer with and an integer for the height.
So let’s say we want to place this at 50 50 and have a width of 100 and a height of 25.Now what happens when we run the application.
And now you’ll see that a rectangle is drawn on our frame.

So what else can we do? There’s another method that we can do on the graphics object, we can set the color which basically sets the drawing color.
It’s like clicking color in a paint program and this expects a Color c. Now there are a couple ways you can use color.

You can create a new instance of color by typing new color and taking a look at different ways you can construct a color.For example you could pass in RGB value.
So if we were to pass 0 red 0 green and 255 or blue this would give us a pure blue color.
Another way you can do it is g.setColor and type the class name itself and statically reference predefined colors.
So you could pick green. So after this line executes our color is set to blue.
So if we were to draw another shape this time let’s see if we draw a oval at say two hundred fifty. Now let’s give it a width of 50 50. So it is a circle.
Now if we were to run the application will see that we have our rectangle drawn and we have our oval drawn and I really suggest you spend some time just playing with this graphics object and trying out different methods.

For example we could instead of drawing a rectangle we could fill a rectangle which expects the exact same parameters so we could say 50, 200, 100 by 25.
Now we run the application again. We’ll see that this time instead of just drawing the outline of the shape it filled the shape. So what else can we do.

let’s try drawstring.

And there’s multiple options for this or let’s choose the second one that accepts a string parameter and an X and a Y.
So for our string we’ll say string. And for the X let’s say 200 and a y of 200.And now if we run the application

my string has been drawn onto our window and the color is also green which makes sense because the last time we set the color we set it to green if we want to change that color back to black. We could go above our draw string and see set color color dot blackand run the application again and this time our text is drawn in black.
So the whole idea here is less to show you how to draw in a window and more to show you the power of inheritance and particularly the power of overriding a method that you are inheriting.
In this case we are overriding how our window itself is painted and that allows us to completely customize what happens to the window when the program runs.
Now if we go back to our subclass and just like if we were to comment out or super.say hello and run the application we have completely overridden the behavior that is defined in our base class.

Now in this case it’s a little more boring because we don’t have a fancy window set up for us to play with but in our drawing program you can start to see the power of overwriting existing functionality.
And just like I said in the last tutorial if you don’t quite get it yet don’t worry because there is still a lot more to learn about inheritance.
Thanks for watching.
